Showing posts with label sdk. Show all posts

Thursday, November 10, 2011

Android: Using monkey from Java


The latest version of the Android SDK and tools include chimpchat, a library that facilitates the use of monkey from Java. This is equivalent to monkeyrunner, which is the bridge between monkey and the Python scripting language.
While Python is an incredibly powerful and expressive scripting language and will permit you creating tests with just a few statements, there are some occasions when you don't want to introduce a new language to the project leaving your Java confort zone or you prefer to leverage the use of previously created libraries instead of writing new ones.
In such cases, you can now have the same access to monkey running on the device with the help of chimpchat, as we are going to demonstrate.


Creating a Java project
Our first step will be to create a new Java project and we will add the required libraries to the Java Build Path as External Jars.
We are naming the project JavaMonkey, for obvious reasons.


We are adding these libraries from Android SDK, which are used directly or indirectly by our project, to the Java Build Path:

  • chimpchat.jar
  • ddmlib.jar
  • guavalib.jar
  • sdklib.jar


JavaMonkey.java
Our intention is to create a simple class, serving the purpose of a simple example to get as started. We will be simply:

  1. Creating a JavaMonkey object
  2. initializing it, this implies creating the connection with any emulator or device found or throwing an exception is not connection was made before the timeout expires
  3. listing all the properties in the device or emulator
  4. shutting down the connection

Following, is the JavaMonkey class: 


/**
 * Copyright (C) 2011  Diego Torres Milano
 */
package com.example.javamonkey;

import java.util.TreeMap;

import com.android.chimpchat.ChimpChat;
import com.android.chimpchat.core.IChimpDevice;

/**
 * @author diego
 *
 */
public class JavaMonkey {

        private static final String ADB = "/Users/diego/opt/android-sdk/platform-tools/adb";
        private static final long TIMEOUT = 5000;
        private ChimpChat mChimpchat;
        private IChimpDevice mDevice;

        /**
         * Constructor
         */
        public JavaMonkey() {
                super();
        TreeMap<String, String> options = new TreeMap<String, String>();
        options.put("backend", "adb");
        options.put("adbLocation", ADB);
        mChimpchat = ChimpChat.getInstance(options);
        }

        /**
         * Initializes the JavaMonkey.
         */
        private void init() {
                mDevice = mChimpchat.waitForConnection(TIMEOUT, ".*");
                if ( mDevice == null ) {
                        throw new RuntimeException("Couldn't connect.");
                }
                mDevice.wake();
        }

        /**
         * List all properties.
         */
        private void listProperties() {
                if ( mDevice == null ) {
                        throw new IllegalStateException("init() must be called first.");
                }
                for (String prop: mDevice.getPropertyList()) {
                        System.out.println(prop + ": " + mDevice.getProperty(prop));
                }
        }

        /**
         * Terminates this JavaMonkey.
         */
        private void shutdown() {
                mChimpchat.shutdown();
                mDevice = null;
        }

        /**
         * @param args
         */
        public static void main(String[] args) {
                final JavaMonkey javaMonkey = new JavaMonkey();
                javaMonkey.init();
                javaMonkey.listProperties();
                javaMonkey.shutdown();
        }

}


Configuration
One of the important things you have to adapt to your environment is the location of the adb command. Otherwise if you don't set it you will receive:

E/adb: Failed to get the adb version: Cannot run program "adb": error=2, No such file or directory


Hope this helps you get started with chimpchat. As always, comments and questions are always welcome.

Friday, December 31, 2010

Problems updating Android to 2.3 in Ubuntu

If you were using Ubuntu 9.10 (karmic) because you wanted to avoid some issues with Eclipse and Android ADT plugin that happened on newer versions on Ubuntu, well now is time to upgrade to the latest Ubuntu 10.10 (maverick) if you want to update to the latest Android 2.3 (gingerbread).

You may have discovered this after the update finished using Android SDK and AVD Manager tool and you sadly realize that your Android development environment was turned useless without a single word of warning. Latest Android SDK version depends on GLIBC_2.11 but it's no available for previous versions of Ubuntu, so unless you want to take the risk of using a different repository trying to find an update with unknown consequences to other components, upgrading is your only possible path.
If this is not a serious bug we should reconsider the definition of the word.

The origin of the problem is that Android SDK distribution is not package based and thus no dependencies are considered before updating the software. This is clearly a nonsense. Google has taken a completely different approach with Chrome which is cleverly distributed from a package repository as we can see in this screenshot of Ubuntu Software Center.


Android SDK must be distributed as packages as Chrome does, otherwise there is no way to prevent this problems happening again and again in the future. We are only scaring people away of Android development with this poor policies. It's true that the requirements page was updated and GLIBC 2.11 is listed now as a requirement, but when you discover it, it's too late. You expect some verifications done from software doing an update that cannot easily be reverted.

This is perhaps the most important bug, but there are others after upgrading to Ubuntu 10.10 (maverick) and Android SDK 2.3 (gingerbread) some other things are still broken, for example hierarchyviewer does not run out of the box and you have to manually copy some libraries,
Android SDK and AVD Manager updates some packages again an again ignoring they are already installed and some deficiencies of the Android ADT Layout editor, to name a few.

I complained about many things about Android in this blog and it seems that in one way or another they were fixed in following releases, so I hopefully think this would be the case.

Wednesday, January 20, 2010

android-fixperms updated

Android SDK 2.1 was released including minor API changes and bug fixes. For information on changes and fixes, see the Framework API section.
If you install Android SDK in a multi-user environment or in a continuous integration server, as was showed in previous posts, you should correct the permissions after updating. That is android-fixperms's raison d'ĂȘtre and as usual, it was updated to support this new SDK version.

Find more information and examples at http://sites.codtech.com/android/android-tools.

Friday, December 04, 2009

Android Testing at Droidcon London 2009


I would like to thank Skills Matter and Novoda for the invitation to present the Android Testing tutorial at Droidcon London 2009.
A very successful event indeed, and a lot of interesting talks were presented.
Presentation slides and other resources can be found at http://android.codtech.com/droidcon2009 or if you prefer at slideshare.

I would also thank Okpala Ikenna N. Jr., who took this and other great pictures of the event that can be seen at flickr.

Wednesday, October 28, 2009

Upgrading to android SDK 2.0

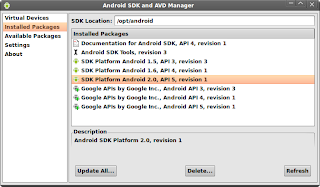
This time the upgrade is much simpler than with previous versions. Upgrading is now supported from inside android tools itself.
Assuming you have already configured your installation to be able to install as root and run as unprivileged users as was described in previous posts, upgrading is a simple task, just run

$ sudo android


the select the desired components to install (i.e.: SDK Platform Android 2.0) and click Install Selected

Once you upgrade you still need to fix the permissions again, to do it run

$ wget -qO - http://android.codtech.com/android-tools/android-fixperms | sudo bash -s -- --sdk --sdk-dir=/opt/android

If you have installed android SDK to a different directory replace /opt/android in previous command by the correct location.

Hope this helps.

Friday, October 09, 2009

Android SDK: one step closer

Starting with the latest android 1.6 SDK release 1, Google is distributing the Linux version as a TGZ file instead of ZIP.
We mentioned the problem of distributing the Linux version as a ZIP file in previous posts, loosing ownerships and file permissions is a problem when you install the SDK or NDK in a multiuser environment.

Well, we are halfway there, still there's some permission problems that you can fix using android-fixperms that can be downloaded from this site.

Use it like this, for example to change the SDK installed at /opt/android-sdk-linux_x86-1.6_r1

$ android-fixperms --sdk --sdk-dir=/opt/android-sdk-linux_x86-1.6_r1

Hope this helps.

Tuesday, September 01, 2009

Fixing Android NDK permissions

Lately Linux is being treated more as a kind of Windows-like than a UNIX-like operating system it really is.
It seems that everybody has forgotten it is a multiuser operating system and most likely you don't want to install a single copy of every software just because some permissions are wrongly set mainly due to be distributed as a ZIP file which doesn't store this information.

Fixing Android SDK permissions was described in Ooops!..., they did it again. Here, we are fixing Android NDK permissions for your multi-user development environment.

Android NDK is a companion tool to the Android SDK that lets Android application developers build performance-critical portions of their apps in native code.

Other problem you may find during installation in Debian and Ubuntu is that Android NDK installation script invokes /bin/sh expecting to be bash. If you use bash syntax you should invoke it using /bin/bash. This problem will be fixed in next release.

Use this script to fix all of the problems, after unzipping as root:

#! /bin/bash


NDK_DIR=${NDK_DIR:-/opt/android-ndk-1.5_r1}

sudo chmod a+rx $NDK_DIR
sudo find $NDK_DIR/ -type d -exec chmod a+rx {} \;
sudo find $NDK_DIR/ ! -perm -044 -exec chmod g+r,o+r {} \;
sudo find $NDK_DIR/ -type d -name bin -exec chmod -R a+x {} \;
[ ! -d $NDK_DIR/out/apps ] && sudo mkdir $NDK_DIR/out/apps
sudo chmod a+rwx $NDK_DIR/out/apps
( cd $NDK_DIR && sudo bash build/host-setup.sh )


Hope this helps.