Tuesday, June 16, 2009

Android: Testing on the Android platform - Running tests


This document can be read in Google Docs (http://docs.google.com/View?id=ddwc44gs_184ftgt73d9), cut and paste link.


This post is about Running Tests on the Android platform. We have analyzed how to create tests before and we will be updating the subject soon covering android SDK 1.5_r2 but now how to run these tests is our target. In future installments of this series of articles we will be analyzing unit and functional tests and the tools introduced here will be helpful depending on the case.


There are at least three different complementary ways of running tests, each with its pros and cons. Latest Android ADT plugin supports running tests from inside Eclipse with no additional changes or requirements simplifying the matter a lot compared with previous versions.


Test can be run:


  • from inside Eclipse

  • from the android shell, using am

  • from inside the emulator using Development Tools -> Instrumentation


There's also different methods of including your tests, one method can be including tests inside the same project and the other is creating a parallel project comprising only the tests. The latter gives the advantage of being easily removable from the final APK, as they are part of a different project. Thus this is the one we will be using in future examples.


Running tests from Eclipse

Latest Android ADT plugin (0.9.1) supports running tests from Eclipse. Once you have your tests created inside a separate project select the root project folder and Run as... -> Android JUnit Test.

This video shows this option.


In this case, the obvious advantage is how clearly you can analyze tests success or failure.


Running tests from command line

Tests can be run from the command line using the android shell and am instrumentation command. This has the clear disadvantage of having to type a quite complex command line and if you are already inside android shell, its poor command line editing and history capabilities won't help you a lot. On the other hand, this is scriptable, so probably you have to type it once and then use some kind of script to run your tests.


You will need something like this:


# am instrument -w -e class com.codtech.android.training.sample.project.tests.SampleTest\#testSimpleCreate com.codtech.android.training.sample.project.tests/android.test.InstrumentationTestRunner

com.codtech.android.training.sample.project.tests.SampleTest:.
Test results for InstrumentationTestRunner=.
Time: 1.14

OK (1 test)


This video illustrates this method:


Running from Instrumentation

On the emulator, Dev Tools -> Instrumentation provides yet another alternative of running your tests.

This video illustrates this method:


To see the results you need to go to DDMS Logcat view in Eclipse.

Conclusion

Depending on the case each particular tool has its own pros and cons. If you are running or re-running a test that has just failed perhaps running from Eclipse is more adequate, if you are running a big test suite and want in some way to automate it, the command line and some scripts could be better. And finally if you are running some functional tests and want to see them while they perform perhaps Dev Tools -> Instrumentation is better.
What's important to notice is that you can use any one on the same set of test suites depending on the case.

Tuesday, May 26, 2009

Ooops!..., they did it again

Once again, the new android sdk 1.5 r2 for Linux is distributed as a zip file and if you intend to use it in a multi-user development environment and install it as root to protect it from unintended changes you'll find some problems.

But again, here you are a shell script to fix the permission problems, also useful if you are building packages for your platform. Set the SDK_DIR variable accordingly to your installation.


#! /bin/bash

SDK_DIR=${SDK_DIR:-/opt/android-sdk-linux_x86-1.5_r2/}

sudo find $SDK_DIR/ -type d -exec chmod a+rx {} \;
sudo find $SDK_DIR/ ! -perm -044 -exec chmod g+r,o+r {} \;

Hope it helps.

Thursday, April 23, 2009

Android Training at Skills Matter in London

May is a big month as we will be launching my first Android course on the international stage!


I've worked for quite some time now with my partner Ricston to develop this course for developers. Ricston have years of experience developing and delivering courses for open source and in 2008 they invited me to work with them to draw on my extensive Android knowledge and experience to create a series of courses for engineers that want to build applications on this exciting platform.


I will be in London to deliver the first course on May 27 at Skills Matter - for more information you can download a course description and find further information on the course on the Ricston or Skills Matter sites. The launch is being offered at specially reduced rates - 50% off! - for this first course so take advantage of this great offer!


I hope to see you in the classroom in May.

Tuesday, April 14, 2009

Android Top animations

You may have read a previous post about "Android Top", an my experiments about custom widget creations.
Well, here in this sample video you can find a rather funny animation when you long touch on the VU Meter face.


This is shown in the emulator and that's why CPU usage increases so high when the animation takes place.

PS: I need to find a better image for VU Meter's back. If you have one to contribute it's gladly welcome.

Monday, April 13, 2009

Android frame by frame animations

Frame by frame animations are traditional animations in the sense that they are created with a sequence of different images, played in order, like a roll of film. The AnimationDrawable class is the basis for frame animations.

This is a sample video of the Android Earth Animation application:


The animations is presented as a Button background and every time you touch it the animation stops and next time the rotational direction is changed (prograde and retrograde motion).

Usually, these animations are defined in XML resource files in the res/anim folder, using the tag and including the drawables composing th e animation.

Some information can be found at Android developers: Frame Animation, however if you want to automatically start the animation when the Activity is just started you'll find a hard time.
You may think that you can start the animation in onCreate or onResume, but it's not going to work.
The simplest solution is to delay the animation start using a timer in onResume:


/* (non-Javadoc) * @see android.app.Activity#onResume() */ @Override protected void onResume() { super.onResume(); (new Timer(false)).schedule(new AnimationTimer(earthButtonAnimation), 100); }


Where AnimationTimer is defined as


private static class AnimationTimer extends TimerTask { AnimationDrawable animation; public AnimationTimer(AnimationDrawable animation) { this.animation = animation; } @Override public void run() { animation.start(); this.cancel(); } }


As usual you can install or download the application or its source code from http://codtech.com/downloads/android.
Hope this helps and save you some time.

UPDATE:


Latest code, including some of the contributions, can be found at github.
Fell free to send me patches and corrections.

Android Tutorial at Linux Symposium

I will be presenting an Introduction to Android development tutorial at Linux Symposium (Canada) from July 13th to 17th 2009.
This year also marks the first year that the Symposium will be happening outside of Ottawa and Centre Mont-Royal in Montreal was selected as the 2009 venue.
Linux Symposium is celebrating 11 years of bringing togheter Linux developers, industry professionals, and enthusiasts from over 30 countries.

Don't miss this opportunity if you are interested in knowing more about Android development.

Saturday, April 11, 2009

Android Top

I'm experimenting creating some custom widgets and one is the VU meter, and I'm trying to make them behave more or less like real ones. The most interesting characteristic of VU meters is their slow measurement averaging out peaks.
In this simple example (see video) instead of measuring loudness I'm measuring CPU and memory usage.


CPU and memory consumption are obtained from kernel's /proc filesystem and top command.
Buffers and Cached memory can be excluded or included from the count long pressing on the memory VU meter.
While the application was running a background process was launched and thus why the CPU usage increases.

I've found this example interesting and wanted to share it.
I hope you find it interesting too.

Tuesday, March 31, 2009

Android Eye Contact

I'm working on Android Eye Contact, and application that complements the standard Android Contacts application and provides alternative presentations.
The application, in its Lite version, can be freely downloaded from Android Market.
There will be also a Pro version, someday when people from other countries other than USA and UK be able to charge from their applications. In the meantime there's a very good opportunity to explore the possibilities analyzing what should be included and what shouldn't.
The main idea behind Android Eye Contact is to provide a seamless user experience easing access to contacts ideally using only one hand and with the phone closed, if we think about the available models only.
Some users requested features like Contacts Flow, and I'm now experimenting on this front, though I'm not completely convinced that this is a good way to glimpse through hundreds of contacts which usually don't have a picture associated.
Anyway, this is highly based on great pictureflow, a Qt2/Qt3/Qt4/Qtopia4 widget to display images with animated transition effect.

Comments, suggestions and ideas you may want to share are gladly welcome.


Friday, March 13, 2009

android web applications seamlessly integrate native widgets

I'm writing some android sample code to be included in training courses and I found this example so interesting that I decided to publish it here to share it with you. I hope you find it interesting too.

This example is extremely simple, just a few lines of code, but demonstrates how powerful the idea of mixing native widgets and web applications can be.

The application consists of an oversimplified web browser based on WebView and a super imposed SeekBar slider that when is moved changes the background color of the page using javascript. The default page is http://google.com to demonstrate that no special javascript code is needed in the page.


Views hierarchy
This is how we defined the layout.


Basically, the idea is to have a RelativeLayout holding the WebView and the SeekBar over it.

Changing the background color

This is the most interesting part, in the SeekBar change listener we will be invoking the javascript needed to change the page background color using the DOM. Also we will be using a simple conversion from the progress value to HSV colors.
To invoke the javascript we use webView.loadUrl.


// change color depending on seek bar position
colorBar.setOnSeekBarChangeListener(new OnSeekBarChangeListener() {

@Override
public void onProgressChanged(SeekBar seekBar, int progress,
boolean fromTouch) {
float p100 = progress / 100.0f;
webView.loadUrl(String.format(
"javascript:{document.body.style.backgroundColor='#%06x'}",
Color.HSVToColor(new float[] {360 * p100, p100, 1 - p100 }) &
OPAQUE));

}

@Override
public void onStartTrackingTouch(SeekBar seekBar) {
// TODO Auto-generated method stub

}

@Override
public void onStopTrackingTouch(SeekBar seekBar) {
// TODO Auto-generated method stub

}

});


Seamless applications
One of the main objectives of the android platform is to provide a seamless experience to the user. In this case we have seen how to seamlessly integrate native and web applications.

Installing the application
To install Android Web Page Background Color Bridge into your phone or emulator visit http://codtech.com/downloads/android directly from the device providing you have an SD card to download it and the required permission enable to install application from Unknown Sources in Settings.

Source code
Source code can also be downloaded from http://codtech.com/downloads/android

Monday, March 09, 2009

Android Meenie early preview: more features described

In my previous post we've seen some basic features of Meenie, like adding placemarks to the map while you are on the road, but there's a more common use case when you are planning your trip in advance and want to add some placemarks, let's say the airport, hotel, office, restaurants, etc.

While it's perfectly possible to use the same use case as being on the road, it's much more confortable to add those placemarks and search for restaurants, hotels or whatever you are looking for in the comfort of your desktop computer. In those cases we will be using Google Maps to help us.
Google Maps has a feature called My Maps, where you can define map placemarks, lines and areas.


Then using a conversion utility which is running in Google Appengine to off-load the processing of the map in the android phone, we will be able to download this map and allow Meenie to show the same content. To locate the map we will be using the URL that appears in Link, in Google Maps top right.

This is the result.


Some details about Google Appengine being access from Android and using the Google Maps Link URL in Meenie and other Android applications were ommited for clarity and will be discussed on upcoming posts.


As always, comments are gladly welcome.

Wednesday, March 04, 2009

Android Meenie early preview

I was working on an Android application that scratchs a personal itch. As I'm traveling very frequently and visiting new cities all the time I always need some information readily available.
For example, the airport, station, hotel, office, venue, places to visit, restaurants, etc.
You need these information quickly accessible, while you travel.

This is an early preview of Android Meenie maps front end. I'm working on the server side now, so more information is coming soon.

Monday, March 02, 2009

Android emulator small bug

I wonder why Android SDK for Linux is distributed as a ZIP file, but anyway if you try to install the SDK in a multiuser environment you'll face some problems.
As usual, in a multiuser environment to avoid undesired changes to the software it should be installed as root.
Unpacking the SDK as root and then running as a normal user you receive this error

### WARNING: Cannot write user data file '/home/diego/.android/SDK-1.1/userdata-qemu.img'

if you check file permissions you can find that you can write to ~/.andrid/SDK-1.1 and userdata-qemu.img has been actually written.

So, what's the problem. Using strace to find out, we can see this

open("/home/diego/.android/SDK-1.1/userdata-qemu.img", O_WRONLY|O_CREAT|O_TRUNC|O_LARGEFILE, 0600) = 3
open("/opt/android-sdk-linux_x86-1.1_r1/tools/lib/images//userdata.img", O_RDONLY|O_NOCTTY|O_LARGEFILE) = -1 EACCES (Permission denied)
close(3) = 0
write(2, "### WARNING: Cannot write user d"..., 109### WARNING: Cannot write user data file '/home/diego/.android/SDK-1.1/userdata-qemu.img': Permission denied ) = 109 unlink("/home/diego/.android/SDK-1.1/userdata-qemu.img.lock") = 0
exit_group(3) = ?

qemu is reporting the wrong error, and the root of the problem is openning /opt/android-sdk-linux_x86-1.1_r1/tools/lib/images//userdata.img for reading.


Here is how to fix it

$ sudo chmod a+r /opt/android-sdk-linux_x86-1.1_r1/tools/lib/images//userdata.img
$ sudo chmod a+r /opt/android-sdk-linux_x86-1.1_r1/tools/lib/images//system.img

and everything will run smoothly.

Friday, February 27, 2009

Blacklisting kernels modules from command line

Sometimes the need to blacklist a module from the Linux kernel command line arise, though it's not very common, and it seems there's no a simple solution.

Well, most distributions support/etc/modprobe.d/blacklist kind of files stored in the filesystem, where you can list the modules to blacklist. But, what if this is not possible, mainly because you don't have a filesystem at all to change and reboot like happened to me while working in the new cult 3.1 thin client OS version ?

I'm listing te change here because it's very useful and can be used in other situations as well, like the one described here using Knoppix.

In the init file, while processing command line options, this snippet should be added

blacklist=*)
for m in $(echo ${x#blacklist=} | sed 's/+/ /g')
do
echo -e "# added by cult\nblacklist $m\n" >> \
/etc/modprobe.d/blacklist
done
;;
Here, the cult convention of separating multiple values in kernel command line options by '+' is used, but you can use ',' as well if you feel more comfortable.

Next time your kernel panics and you need to blacklist a module from the kernel command line you know.

Friday, January 02, 2009

Solved: Ubuntu 8.04 64 bit, Eclipse 3.4, Subclipse 1.4.7 and Subversion 1.5

A previous post, a possible solution to the problem of installing Subversion support in Eclipse 3.4 on Ubuntu 8.04 64 bit.
Although this worked much better Eclipse is still crashing under some operations. I've detected a problem while developing an android application, checked out from a subversion repository, when R.java is recreated causing Eclipse to crash.

This time, and convinced to find a solution or being forced to use Windows Vista as a development platform, I paid more attention to the crash log.

#
# An unexpected error has been detected by Java Runtime Environment:
#
# SIGSEGV (0xb) at pc=0x00007fbacc7e525a, pid=29545, tid=1098688848
#
# Java VM: Java HotSpot(TM) 64-Bit Server VM (10.0-b23 mixed mode linux-amd64)
# Problematic frame:
# V [libjvm.so+0x1f125a]
#
# If you would like to submit a bug report, please visit:
# http://java.sun.com/webapps/bugreport/crash.jsp
# The crash happened outside the Java Virtual Machine in native code.
# See problematic frame for where to report the bug.
#

--------------- T H R E A D ---------------

Current thread (0x00000000401a7400): JavaThread "CompilerThread1" daemon [_thread_in_native, id=29552, stack(0x00000000416ca000,0x00000000417cb000)]

siginfo:si_signo=SIGSEGV: si_errno=0, si_code=1 (SEGV_MAPERR), si_addr=0x0000000000000000

Registers:
RAX=0x0000000000000000, RBX=0x00007fba8c561068, RCX=0x00007fba9a4ef5b0, RDX=0x0000000000000050
RSP=0x00000000417c6d70, RBP=0x00000000417c6de0, RSI=0x00007fba9a4ef5b0, RDI=0x00007fba8c561068
R8 =0x00007fba9a4ef608, R9 =0x00007fba9a4ef5b0, R10=0x00007fba9a4ef5b0, R11=0x0000000000000000
R12=0x00007fba8c561030, R13=0x0000000000000000, R14=0x0000000040162f50, R15=0x0000000000000001
RIP=0x00007fbacc7e525a, EFL=0x0000000000010246, CSGSFS=0x0000000000000033, ERR=0x0000000000000004
TRAPNO=0x000000000000000e

Top of Stack: (sp=0x00000000417c6d70)
0x00000000417c6d70: 00007fba9b0d1358 00000001ffffffff
0x00000000417c6d80: 00007fba9a4ef5b0 00000002cc789361
0x00000000417c6d90: 00007fba9b0d1350 00000007417c79a0
0x00000000417c6da0: 00000000417c7a68 01000000000005d2
0x00000000417c6db0: 00000000417c79a0 00007fbacce2e970
0x00000000417c6dc0: 00000000417c79a0 00000000417c6f30
0x00000000417c6dd0: 00000000417c6ef0 00000000417c6ec0
0x00000000417c6de0: 00000000417c7000 00007fbacc7e479c
0x00000000417c6df0: 00000000417c7a68 00000000417c6fb0
0x00000000417c6e00: 00007fba8c3e8010 00007fba8c000020
0x00000000417c6e10: 00000000417c6e80 00007fbacce47d70
0x00000000417c6e20: 00007fba8c104a50 0000000000000174
0x00000000417c6e30: 00000000417c7ac0 00007fbaccfe6c1c
0x00000000417c6e40: 00000000417ca950 00000000417c6e80
0x00000000417c6e50: 00007fbacce4a4e0 00007fba9a80ff90
0x00000000417c6e60: 0000000000000174 00007fbaccc1edf2
0x00000000417c6e70: 0000000040111030 00007fbaccc1eec1
0x00000000417c6e80: 00000000417ca950 00000000417c6ec0
0x00000000417c6e90: 00007fbacce4a4e0 0000000000007fe8
0x00000000417c6ea0: 00007fba8c39f620 00007fbaccc1edf2
0x00000000417c6eb0: 0000000040111030 00007fbaccc1eec1
0x00000000417c6ec0: 00007fbacce2e970 00007fba0000000e
0x00000000417c6ed0: 00000000417c9350 00000000417c79a0
0x00000000417c6ee0: 0000000000000a05 00000000401a79a0
0x00000000417c6ef0: 000000000000000d 00000000417c9350
0x00000000417c6f00: 00007fba8c5bad00 00007fbacc788d00
0x00000000417c6f10: 00007fba8c54f5a0 00000000000005d3
0x00000000417c6f20: 00000000417c6fb0 00007fba8c11dc70
0x00000000417c6f30: 000000000000000c 00000000417c9350
0x00000000417c6f40: 00007fba8c19c360 00007fba8c2d3790
0x00000000417c6f50: 00007fba8c0d9750 00007fba8c0da3b0
0x00000000417c6f60: 00007fba9bd08e60 00000000417c7ac0

Instructions: (pc=0x00007fbacc7e525a)
0x00007fbacc7e524a: 48 89 cf 41 ff 95 80 00 00 00 48 89 df 49 89 c5
0x00007fbacc7e525a: 8b 00 41 21 44 24 38 41 8b 45 04 21 43 04 41 8b

Stack: [0x00000000416ca000,0x00000000417cb000], sp=0x00000000417c6d70, free space=1011k
Native frames: (J=compiled Java code, j=interpreted, Vv=VM code, C=native code)
V [libjvm.so+0x1f125a]
V [libjvm.so+0x1f079c]
V [libjvm.so+0x2445f5]
V [libjvm.so+0x241105]
V [libjvm.so+0x1e05f7]
V [libjvm.so+0x248f98]
V [libjvm.so+0x248936]
V [libjvm.so+0x62a819]
V [libjvm.so+0x624ac1]
V [libjvm.so+0x50630a]


Current CompileTask:
C2:1124 org.eclipse.core.internal.dtree.DataTreeNode.forwardDeltaWith([Lorg/eclipse/core/internal/dtree/AbstractDataTreeNode;[Lorg/eclipse/core/internal/dtree/AbstractDataTreeNode;Lorg/eclipse/core/internal/dtree/IComparator;)[Lorg/eclipse/core/internal/dtree/AbstractDataTreeNode; (469 bytes)


--------------- P R O C E S S ---------------

Java Threads: ( => current thread )
0x00007fbaa47d7800 JavaThread "org.eclipse.jdt.internal.ui.text.JavaReconciler" daemon [_thread_blocked, id=30170, stack(0x0000000041d08000,0x0000000041e09000)]
0x0000000040347000 JavaThread "Worker-11" [_thread_blocked, id=30132, stack(0x0000000040e0c000,0x0000000040f0d000)]
0x00007fba9c43c400 JavaThread "Worker-10" [_thread_blocked, id=30131, stack(0x000000004100e000,0x000000004110f000)]
0x00007fba9bec9800 JavaThread "Worker-9" [_thread_blocked, id=29647, stack(0x0000000041210000,0x0000000041311000)]
0x00007fbaa69c5c00 JavaThread "SVN Kit 1.2 Connector" [_thread_blocked, id=29611, stack(0x000000004245a000,0x000000004255b000)]
0x00007fba9becf800 JavaThread "Thread-14" [_thread_blocked, id=29609, stack(0x0000000042359000,0x000000004245a000)]
0x00007fbaa623a000 JavaThread "Timer-1" [_thread_blocked, id=29607, stack(0x000000004110f000,0x0000000041210000)]
0x00007fbaa43b9000 JavaThread "Worker-8" [_thread_blocked, id=29602, stack(0x0000000042258000,0x0000000042359000)]
0x00007fba9dda5400 JavaThread "Worker-7" [_thread_blocked, id=29601, stack(0x0000000040f0d000,0x000000004100e000)]
0x00007fba9dcd9400 JavaThread "Worker-6" [_thread_in_vm, id=29600, stack(0x0000000041bcf000,0x0000000041cd0000)]
0x00007fba9beec800 JavaThread "Worker-4" [_thread_blocked, id=29598, stack(0x0000000042056000,0x0000000042157000)]
0x00007fbaa498d800 JavaThread "Timer-0" [_thread_blocked, id=29592, stack(0x000000004074d000,0x000000004084e000)]
0x00007fba9af2a800 JavaThread "Device List Monitor" daemon [_thread_in_native, id=29591, stack(0x0000000042157000,0x0000000042258000)]
0x00007fba9da2b800 JavaThread "Monitor" daemon [_thread_in_native, id=29574, stack(0x0000000041f55000,0x0000000042056000)]
0x00007fba9c3e5800 JavaThread "org.eclipse.jdt.internal.ui.text.JavaReconciler" daemon [_thread_blocked, id=29571, stack(0x000000004064c000,0x000000004074d000)]
0x00007fbaa5500800 JavaThread "Java indexing" daemon [_thread_blocked, id=29569, stack(0x0000000041e54000,0x0000000041f55000)]
0x0000000040378c00 JavaThread "Start Level Event Dispatcher" daemon [_thread_blocked, id=29561, stack(0x000000004054b000,0x000000004064c000)]
0x000000004031d800 JavaThread "Framework Event Dispatcher" daemon [_thread_blocked, id=29560, stack(0x0000000041ace000,0x0000000041bcf000)]
0x0000000040437400 JavaThread "State Data Manager" daemon [_thread_blocked, id=29559, stack(0x00000000419cd000,0x0000000041ace000)]
0x00000000401a9000 JavaThread "Low Memory Detector" daemon [_thread_blocked, id=29553, stack(0x00000000417cb000,0x00000000418cc000)]
=>0x00000000401a7400 JavaThread "CompilerThread1" daemon [_thread_in_native, id=29552, stack(0x00000000416ca000,0x00000000417cb000)]
0x000000004019bc00 JavaThread "CompilerThread0" daemon [_thread_blocked, id=29551, stack(0x00000000415c9000,0x00000000416ca000)]
0x000000004019a400 JavaThread "Signal Dispatcher" daemon [_thread_blocked, id=29550, stack(0x00000000414c8000,0x00000000415c9000)]
0x0000000040176400 JavaThread "Finalizer" daemon [_thread_blocked, id=29549, stack(0x000000004097a000,0x0000000040a7b000)]
0x0000000040175000 JavaThread "Reference Handler" daemon [_thread_blocked, id=29548, stack(0x0000000040879000,0x000000004097a000)]
0x0000000040113000 JavaThread "main" [_thread_in_vm, id=29546, stack(0x00000000413c7000,0x00000000414c8000)]

Other Threads:
0x000000004016fc00 VMThread [stack: 0x0000000040b09000,0x0000000040c0a000] [id=29547]
0x00000000401ab000 WatcherThread [stack: 0x00000000418cc000,0x00000000419cd000] [id=29554]

VM state:not at safepoint (normal execution)

VM Mutex/Monitor currently owned by a thread: None

Heap
def new generation total 42496K, used 9220K [0x00007fbaa84d0000, 0x00007fbaab2e0000, 0x00007fbaada20000)
eden space 37824K, 14% used [0x00007fbaa84d0000, 0x00007fbaa8a53ac0, 0x00007fbaaa9c0000)
from space 4672K, 76% used [0x00007fbaaa9c0000, 0x00007fbaaad3d7b0, 0x00007fbaaae50000)
to space 4672K, 0% used [0x00007fbaaae50000, 0x00007fbaaae50000, 0x00007fbaab2e0000)
tenured generation total 94144K, used 48464K [0x00007fbaada20000, 0x00007fbab3610000, 0x00007fbab84d0000)
the space 94144K, 51% used [0x00007fbaada20000, 0x00007fbab0974090, 0x00007fbab0974200, 0x00007fbab3610000)
compacting perm gen total 86016K, used 85928K [0x00007fbab84d0000, 0x00007fbabd8d0000, 0x00007fbac84d0000)
the space 86016K, 99% used [0x00007fbab84d0000, 0x00007fbabd8ba3b8, 0x00007fbabd8ba400, 0x00007fbabd8d0000)
No shared spaces configured.

Dynamic libraries:
40000000-40009000 r-xp 00000000 08:05 424775 /usr/lib/jvm/java-6-sun-1.6.0.07/jre/bin/java
40108000-4010a000 rwxp 00008000 08:05 424775 /usr/lib/jvm/java-6-sun-1.6.0.07/jre/bin/java
4010a000-4054b000 rwxp 4010a000 00:00 0 [heap]
4054b000-4054e000 ---p 4054b000 00:00 0
4054e000-4064c000 rwxp 4054e000 00:00 0
4064c000-4064f000 ---p 4064c000 00:00 0

...

VM Arguments:
jvm_args: -Djava.library.path=/usr/share/java/ -Djava.library.path=/usr/lib/jni/ -Dosgi.requiredJavaVersion=1.5 -Xms40m -Xmx256m -XX:MaxPermSize=256m
java_command: /opt/java/eclipse-3.4/plugins/org.eclipse.equinox.launcher_1.0.101.R34x_v20080819.jar -os linux -ws gtk -arch x86_64 -showsplash -launcher /opt/java/eclipse-3.4/eclipse -name Eclipse --launcher.library /opt/java/eclipse-3.4/plugins/org.eclipse.equinox.launcher.gtk.linux.x86_64_1.0.101.R34x_v20080731/eclipse_1115.so -startup /opt/java/eclipse-3.4/plugins/org.eclipse.equinox.launcher_1.0.101.R34x_v20080819.jar -exitdata 1190018 -vm /usr/bin/java -vmargs -Djava.library.path=/usr/share/java/ -Djava.library.path=/usr/lib/jni/ -Dosgi.requiredJavaVersion=1.5 -Xms40m -Xmx256m -XX:MaxPermSize=256m -jar /opt/java/eclipse-3.4/plugins/org.eclipse.equinox.launcher_1.0.101.R34x_v20080819.jar
Launcher Type: SUN_STANDARD

Environment Variables:
PATH=/home/diego/bin:/usr/local/sbin:/usr/local/bin:/usr/sbin:/usr/bin:/sbin:/bin:/usr/games
USERNAME=diego
LD_LIBRARY_PATH=/usr/lib/jvm/java-6-sun-1.6.0.07/jre/lib/amd64/server:/usr/lib/jvm/java-6-sun-1.6.0.07/jre/lib/amd64:/usr/lib/jvm/java-6-sun-1.6.0.07/jre/../lib/amd64:/usr/lib64/xulrunner-addons
SHELL=/bin/bash
DISPLAY=:0.0

Signal Handlers:
SIGSEGV: [libjvm.so+0x661750], sa_mask[0]=0x7ffbfeff, sa_flags=0x10000004
SIGBUS: [libjvm.so+0x661750], sa_mask[0]=0x7ffbfeff, sa_flags=0x10000004
SIGFPE: [libjvm.so+0x504550], sa_mask[0]=0x7ffbfeff, sa_flags=0x10000004
SIGPIPE: SIG_IGN, sa_mask[0]=0x00000000, sa_flags=0x00000000
SIGXFSZ: [libjvm.so+0x504550], sa_mask[0]=0x7ffbfeff, sa_flags=0x10000004
SIGILL: [libjvm.so+0x504550], sa_mask[0]=0x7ffbfeff, sa_flags=0x10000004
SIGUSR1: SIG_DFL, sa_mask[0]=0x00000000, sa_flags=0x00000000
SIGUSR2: [libjvm.so+0x5067c0], sa_mask[0]=0x00000000, sa_flags=0x10000004
SIGHUP: [libjvm.so+0x506520], sa_mask[0]=0x7ffbfeff, sa_flags=0x10000004
SIGINT: [libjvm.so+0x506520], sa_mask[0]=0x7ffbfeff, sa_flags=0x10000004
SIGTERM: [libjvm.so+0x506520], sa_mask[0]=0x7ffbfeff, sa_flags=0x10000004
SIGQUIT: [libjvm.so+0x506520], sa_mask[0]=0x7ffbfeff, sa_flags=0x10000004


--------------- S Y S T E M ---------------

OS:lenny/sid

uname:Linux 2.6.24-22-generic #1 SMP Mon Nov 24 19:35:06 UTC 2008 x86_64
libc:glibc 2.7 NPTL 2.7
rlimit: STACK 8192k, CORE 0k, NPROC 12221, NOFILE 1024, AS infinity
load average:0.49 0.31 0.27

CPU:total 2 (2 cores per cpu, 1 threads per core) family 6 model 15 stepping 6, cmov, cx8, fxsr, mmx, sse, sse2, sse3, ssse3

Memory: 4k page, physical 1537752k(21980k free), swap 3148700k(3103580k free)

vm_info: Java HotSpot(TM) 64-Bit Server VM (10.0-b23) for linux-amd64 JRE (1.6.0_07-b06), built on Jun 10 2008 01:53:27 by "java_re" with gcc 3.2.2 (SuSE Linux)

time: Mon Dec 29 22:56:29 2008
elapsed time: 490 seconds


As we can see, the problem is not in subclipse or subversive but in the java virtual machine. It's true, that the problem only showed up when we use subversion, but this is another story.
So, to obtain the solution, download jdk-6u11-linux-x64.bin from Sun and install it.
Next step is to tell Eclipse to use this newly installed java.
Edit eclipe.ini and add these lines

-showsplash
org.eclipse.platform
-vm
/opt/java/jdk1.6/bin/java
-vmargs
-Djava.library.path=/usr/share/java/
-Djava.library.path=/usr/lib/jni/
-Dosgi.requiredJavaVersion=1.5
-Xms40m
-Xmx256m
-XX:MaxPermSize=256m


Problem solved !
No crashes till now...

Android Intent Playground 2.0 (Installation)

These are the simplest steps to install Android Intent Playground using the emulator.


Download site
Go to http://codtech.com/downloads/android and download AndroidIntentPlayground.apk.
To be able to download it you need to attach an sdcard image to the emulator using -sdcard sdcard.img.

Install blocked
Click on the recently downloaded application to install it.
If you receive an Install blocked message you have to enable installation of applications form unknown sources, not only from Android Market.


Enable installation from unknown sources
Go to Settings and enable Unknown sources.

Install application
Once the settings are correct the application can be installed.


Launch the application
After being successfully installed launch the application and you will be presented with Android Intent Playground main screen.


Play with intents
Fell free to play with intents. Using Menu -> Random is a good way to get started.

Sunday, December 28, 2008

Ubuntu 8.04 64 bit, Eclipse 3.4, Subclipse 1.4.7 and Subversion 1.5

How to get these working together ?
Firstly, it's incredible that such a simple thing requires such a big amount of research, trial and error and frustration when should work out-of-the-box.
I'm writing this post hoping to save somebody else precious development time.

Introduction
Subclipse 1.4.7 requires Subversion 1.5 which is not available in normal Ubuntu repositories.
Eclipse just crashes using other combinations, in this environment.

Subversion 1.5
Install subversion 1.5 from Ubuntu backports. Just download the required packages and install them, there's no need to enable backports repository just for this.
Download the following packages:
  • subversion (> 1.5)
  • libsvn1 (>1.5)
  • libsvn-java (>1.5)
and install them using dpkg, for example in 64 bit

$ sudo dpkg --install libsvn-java_1.5.1dfsg1-1ubuntu2_amd64.deb \
libsvn1_1.5.1dfsg1-1ubuntu2_amd64.deb \
subversion_1.5.1dfsg1-1ubuntu2_amd64.deb

Subclipse 1.4.7
Add http://subclipse.tigris.org/update_1.4.x site to Eclipse and install Subclipse 1.4.7, Subversion Client Adapter 1.5.2 and Subversion Native Client Library Adapter (JavaHL) 1.5.5

Configuring Eclipse 3.4
If you try to use Subversion in Eclipse you will receive and error, because the Subversion JNI libraries are not detected.
To achieve thisd you have to edit eclipse.ini (the path depends on where you've decided to install it, as it's not installed from deb packages)
Add these two lines (this is the little magic)

-showsplash
org.eclipse.platform
-vmargs
-Djava.library.path=/usr/share/java/
-Djava.library.path=/usr/lib/jni/
-Dosgi.requiredJavaVersion=1.5
-Xms40m
-Xmx256m
-XX:MaxPermSize=256m

and, after restarting Eclipse, you will be able to use Subversion.
Verify that under SVN Interface the correct JavaHL version is detected in Window -> Preferences -> Team -> SVN.

Android Intent Playground 2.0

Android Intent Playground 2.0 was released.


Check the previous post too: Diego Torres Milano's blog: Android: Playing with Intents which refers to a previous version.


This new version includes some extra features to help you understand and test Android intents.

Installation
Use the method described in Diego Torres Milano's blog: Android Intent Playground 2.0 installation or download AndroidIntentPlayground.apk and install it on the emulator using

adb install AndroidIntentPlayground.apk


Usage
After successful installation the launcher icon appear on the main screen


Launch Intent Playground and the main screen appears

we can tailor an Intent, filling some of its attributes, and then do something with it for example starting the corresponding application.
Among these Intent attributes we can set


actionthe general action of the Intent, such as ACTION_VIEW, ACTION_EDIT, ACTION_MAIN, etc.
attributethe data to operate on, specified as an (attribute, value) pair.
Can be a

  • data uri
  • category
  • mime type

valuethe actual value to complete the (attribute, value) pair as specified in attribute
intentspecifies what to do with the intent

  • start an activity
  • broadcast the intent
  • start a service
  • resolve the activity

activitythe resolved activity


Random intents
There's a menu option to fill in random values, from a pre built list, of intent attributes

Wednesday, December 24, 2008

ge2adt new release

In this previous post, we reviewed Google Earth to Android ADT  (ge2adt) a simple application to convert Google Earth's KML routes to a format suitable to be loaded into Android ADT Emulator Control.
ge2adt has been updated to allow the conversion directly from Google Earth's KMZ routes, avoiding the unzipping step.

Friday, December 19, 2008

Android, Google Earth and KML routes

Whilst testing location based applications, the need to simulate routes is likely to appear.
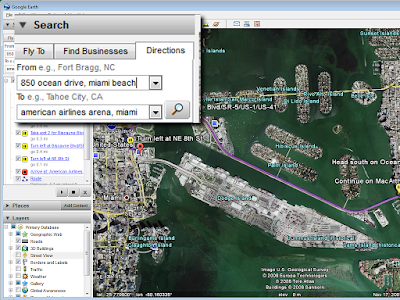
This article shows you how to obtain KML routes using Google Earth, convert it to a suitable format to be loaded into Eclipse ADT plugin Emulator Control and be able to test location based applications.

Create the route
Using Google Earth, create the route using Directions.

Then right click on Route, at the end of the list of directions, and save it. Let's say, we save it as myroute.kmz.

Convert the route
To be used with the current version of Android ADT plugin (0.8.0) a slightly different format is needed as is not supported.
We have to convert the route to use multiple s.

The change is really simple and we could do it manually, but fortunately there's an application to automate this task.
ge2adt is hosted on Google Appengine and can be reached at http://ge2adt.appspot.com/.
Use your Google identifier to access it (i.e.: you gmail account).

Unzip kmz, extract doc.kml, rename it, upload myroute.kml, convert it, and save the result as myroute-adt.kml.

Test my location
Using Eclipse Android DDMS perspective, under Emulator Control, load the converted KML file myroute-adt.kml.


Once the route is loaded, use you location based application or launch Maps, select My Location on the menu, press the play button on Emulator Control and you will be able to appreciate the map moving along the route.


Wednesday, December 03, 2008

Android Development Workshop slides

I was a great opportunity to present this at Mobile Dev Camp, if you couldn't attend, 
presentation slides are available at http://www.slideshare.net/pr1001/android-development-workshop-presentation